Running computations on the Slurm cluster
What is the Slurm cluster?
The DCCN HPC cluster is a pool of high-end computers (also referred to as compute nodes) managed by a cluster manager called Slurm. Instead of allowing users to login to a computer and run computations freely, user submits their computations in the form of jobs to the Slurm cluster.
Every job is submitted to the cluster with a set of resource requirements (e.g. duration of the computation, number of CPU/GPU cores, amount of RAM, etc.). Based on the requirement, jobs are arranged internally in job queues. The job scheduler of Slurm is responsible for prioritizing jobs and assigning them accordingly to compute nodes on which the job requirements are fulfilled. The system also guarantees dedicated resources for the job. Thus, interference between different computations is minimized, resulting in a more predictable job completion time.
Note
Computing resource (e.g. the amount of CPU, GPU, memory) required by a job is always allocated to the job exclusively.
Migrating from Torque/PBS to Slurm
For Torque/PBS user using Slurm the first time, the table below provides a simplified command-line mapping betwee Torque/PBS and Slurm.
Task |
Torque/PBS |
Slurm |
|---|---|---|
Submit a job |
qsub myjob.sh |
sbatch myjob.sh |
Delete a job |
qdel 123 |
scancel 123 |
Show job status |
qstat |
squeue |
Show expected job start time |
- (showstart in Maui/Moab) |
squeue –start |
Show queue info |
qstat -q |
sinfo |
Show job details |
qstat -f 123 |
scontrol show job 123 sacct -j 123 |
Show queue details |
qstat -Q -f <queue> |
scontrol show partition <partition_name> |
Show node details |
pbsnode n0000 |
scontrol show node n0000 |
Show QoS details |
- (mdiag -q <QoS> in Maui/Moab) |
sacctmgr show qos <QoS> |
Resource sharing and job prioritization
For optimizing the utilization of the computing resources, certain resource-sharing and job prioritization policies are applied to jobs submitted to the Slurm cluster. The implications to users can be seen from the three aspects: cluster limits*, **job limits and job priority.
Cluster limits
There are cluster-wide limits on resource usage and job submission per user. Those are:
number of running jobs |
300 |
number of queued jobs |
2000 |
total memory |
2560 GB |
total CPU cores |
300 |
total GPUs |
4 |
Beyond these limits, the user is allowed to run a few high-priority interactive jobs (i.e. jobs submitted to the interactive partition) with the following limits:
partition |
runnable jobs |
queued jobs |
total memory |
total CPU cores |
|---|---|---|---|---|
interactive |
2 |
4 |
128 GB |
32 |
Job limits
Each job is limited by a maximum amount of walltime and memory. Jobs with resource requirements beyond the limit will be rejected for submission.
partition |
max. walltime |
max. memory |
|---|---|---|
batch |
72 hours |
256 GB |
interactive |
72 hours |
64 GB |
gpu |
72 hours |
256 GB |
gpu40g |
72 hours |
256 GB |
Job priority
partition |
priority |
|---|---|
batch |
normal |
interactive |
high |
gpu |
normal |
gpu40g |
normal |
Job priority determines the order of waiting jobs to start in the cluster. Job priority is calculated based on various factors. In the cluster at DCCN, mainly the following two factors are considered.
The waiting time a job has spent in the queue: this factor will add one additional priority point to jobs waiting for one additional minute in the queue.
Partition priority: this factor is mainly used for boosting interactive jobs (i.e. jobs submitted to the interactive partition) with an outstanding priority offset so that they will be started sooner than other types of jobs.
The final job priority combining the two factors is used by the scheduler to order the waiting jobs accordingly. The first job on the ordered list is the next to start in the cluster.
Note: Job priority calculation is dynamic and not completely transparent to users. One should keep in mind that the cluster does not treat the jobs as “first-come first-serve”.
The slurm module
Wrapper scripts, such as vncmanager, matlab, rstudio, pycharm, etc. are available via environment module slurm.
$ module load slurm
Interactive job
The simplest way to submit an interactive job is using the sbash wrapper script as it takes care of the settings and options required for running graphical applications.
Hereafter is an example command to start an interactive job with the requirement of 10 hour walltime and 4 GB memory:
$ sbash --time=10:00:00 --mem=4gb
The terminal will be blocked until the job starts on the compute node.
Similarly, you could also use the native Slurm command srun, for example:
$ srun --time=10:00:00 --mem=4gb -p interactive --pty bash -i
If you intend to run graphical applications, the interactive job should be submitted with an additional --x11 option. For example,
$ srun --x11 --time=10:00:00 --mem=4gb -p interactive --pty bash -i
If you additionally require a GPU, the interactive job should be submitted with an --partition=gpu --gres=gpu:1 option, but without -p interactive. For example,
$ srun --x11 --partition=gpu --gres=gpu:1 --time=01:00:00 --mem=4gb --pty bash -i
Batch job
prepare a batch job script like the one below and save it to a file, e.g.
slurm_first_job.sh:#!/bin/bash #SBATCH --job-name=myfirstjob #SBATCH --nodes=1 #SBATCH --time=0-00:05:00 #SBATCH --mail-type=FAIL #SBATCH --partition=batch #SBATCH --mem=5GB hostname echo "Hello from job: ${SLURM_JOB_NAME} (id: ${SLURM_JOB_ID})" sleep 600
The script is essentially a bash script with few comment lines right after the script’s shebang (i.e. the first line). Those comment lines are started with
#SBATCHfollowed by options the same as the options supported by Slurm’s job submission programsbatch.submit the job script to slurm
$ sbatch slurm_first_job.sh
Submitted batch job 951
A job id is returned after job submission. In the example above, the job id is 951.
In the example above, sbatch options were defined in the job script. You can, however, also pass them directly (overruling the options in the job script), e.g. like this:
$ sbatch --mem=1G --time=00:01:00 slurm_first_job.sh
You can even pass your script directly, using a so-called “Here” document (Heredoc, defined by a start << EOF and end EOF)
$ sbatch --mem=1G --time=00:01:00 << EOF
#!/bin/bash
echo "Hello world! No script had to be written to disk to run me :-)"
EOF
Job status and information
One can use the turm --me to get a TUI overview , which provides a convenient way to manage your cluster jobs.
Alternatively, one can use the squeue --me to get an overview of running and pending jobs.
$ squeue --me
    JOBID PARTITION     NAME     USER ST       TIME  NODES NODELIST(REASON)
    951   batch     myfirstj   honlee  R       0:05      1 dccn-c079
To get the job’s detailed information, one uses the command scontrol:
$ scontrol show job 951
JobId=951 JobName=myfirstjob
UserId=honlee(10343) GroupId=tg(601) MCS_label=N/A
Priority=829 Nice=0 Account=tg QOS=normal
JobState=RUNNING Reason=None Dependency=(null)
Requeue=1 Restarts=0 BatchFlag=1 Reboot=0 ExitCode=0:0
RunTime=00:03:16 TimeLimit=00:05:00 TimeMin=N/A
SubmitTime=2023-08-24T16:19:17 EligibleTime=2023-08-24T16:19:17
AccrueTime=2023-08-24T16:19:17
...
Note
squeue and scontrol can only be used to display status/information of running and pending jobs. Use the command sacct to get information about historical job.
Once the job is completed, one should use the sacct command to get the information:
$ sacct -j 951
JobID           JobName  Partition    Account  AllocCPUS      State ExitCode
------------ ---------- ---------- ---------- ---------- ---------- --------
951          myfirstjob      batch         tg          1    TIMEOUT      0:0
951.batch         batch                    tg          1  CANCELLED     0:15
951.extern       extern                    tg          1  COMPLETED      0:0
sacct has an option --json to dump the output in JSON format. It can be used together with jq for further processing of the job information. For example, to get on which nodes resources were allocated for the job:
$ sacct --json -j 951 | jq -r '.jobs[] | .nodes'
dccn-c079
Job deletion
To delete a running or pending job, one use the scancel command:
$ scancel 951
Output streams of the job
On the compute node, the job itself is executed as a process in the system. The default STDOUT and STDERR streams of the process are both redirected to a file named slurm-<job_id>.out within the directory from which a job is submitted. The file is available from the start of the job.
Specifying resource requirements
Each job submitted to the cluster comes with a resource requirement. The job scheduler and resource manager of the cluster make sure that the needed resources are allocated for the job. To allow the job to complete successfully, it is important that a right and sufficient amount of resources are specified at the job submission time.
1 CPU core, 4 gigabytes memory and 12 hours wallclock time
$ sbatch -N 1 -c 1 --ntasks-per-node=1 --mem=4G --time=12:00:00 job.sh
4 CPU cores on a single node, 12 hours wallclock time, and 4 GB memory
$ sbatch -N 1 -c 4 --ntasks-per-node=1 --mem=4G --time=12:00:00 job.sh
1 CPU core, 500 GB of free local “scratch” diskspace, 12 hours wallclock time, and 4 GB memory
$ sbatch -N 1 -c 1 --ntasks-per-node=1 --mem=4G --time=12:00:00 --tmp=500G job.sh
1 Intel CPU core, 4 gigabytes memory and 12 hours wallclock time
$ sbatch -N 1 -c 1 --ntasks-per-node=1 --mem=4G --time=12:00:00 --tmp=500G --gres=cpu:intel job.sh
Here we ask the allocated CPU core to be on a node with GRES cpu:intel.
4 CPU cores distributed on 2 nodes, 12 hours wallclock time, and 4 GB memory per node.
$ sbatch -N 2 -n 4 --mem=4G --time=12:00:00 job.sh
Here we use -n to specify the amount of CPU cores we need; and -N to specify from how many compute nodes the CPU cores should be allocated. In this scenario, the job (or the application the job runs) should take care of the communication between the processors distributed on many nodes. This is typically for the MPI-like applications.
1 GPU interactive with 12 hours wallclock time, and 4 GB memory.
$ srun --partition=gpu --gres=gpu:1 --mem=4G --time=12:00:00 --pty /bin/bash
1 GPU interactive with specific GPU specification, 12 hours wallclock time, and 4 GB memory.
$ srun --partition=gpu --gpus=nvidia_rtx_a6000:1 --mem=4G --time=12:00:00 --pty /bin/bash
2 GPU’s interactive with specific GPU model, 12 hours wallclock time, and 4 GB memory.
$ srun --partition=gpu --gpus=nvidia_a100-sxm4-40gb:2 --mem=4G --time=12:00:00 --pty /bin/bash
The command above requests 2 GPUs with specific model name nvidia_a100-sxm4-40gb. The following GPU models are available in the cluster:
9x NVidia P100 16GB (model name
tesla_p100-pcie-16gb)6x NVidia A100 40GB PCIe (model name
nvidia_a100-pcie-40gb)1x NVidia A100 80GB (model name
nvidia_a100_80gb_pcie)2x NVidia A100 80GB, each partitioned into 2x MIG instances (model name
nvidia_a100_80gb_pcie_3g.39gb)8x NVidia A100 40GB SXM4 (model name
nvidia_a100-sxm4-40gb)4x NVidia L40s 48GB (model name
nvidia_l40s)4x NVidia A16 16GB (model name
nvidia_a16)1x NVidia RTX A6000 48GB (model name
nvidia_rtx_a6000)
The --partition=gpu option is needed. Without this option the job will fail.
Note
For accessing any GPU with more than 40GB VRAM, it would be easier to use the partition gpu40g. For example,
$ srun --partition=gpu40g --gpus=1 --mem=4G --time=12:00:00 --pty /bin/bash
Note
Some applications, such as Matlab, do not support the Nvidia MIG (GPU partitioning) fully. If you need to avoid job being assigned to a patitioned GPU, you could use the –constraint=nomig. For example,
$ srun --partition=gpu40g --gpus=1 --constraint=nomig --mem=4G --time=12:00:00 --pty /bin/bash
Estimating resource requirements
As we have mentioned, every job has attributes specifying the required resources for its computation. Based on those attributes, the job scheduler allocates resources for jobs. The more precise these requirement attributes are given, the more efficiently the resources are used. Therefore, we encourage all users to estimate the resource requirements before submitting massive jobs to the cluster.
The walltime and memory requirements are the most essential ones amongst others. Hereafter are three different ways to make estimations of those two requirements.
Note
Computing resources in the cluster are reserved for jobs in terms of size (e.g. amount of requested memory and CPU cores) and duration (e.g. the requested walltime). Under-estimating the requirement causes the job to be killed before completion and thus the resources consumed by the job were wasted; while over-estimating blocks resources from being used efficiently.
Consult your colleagues
If your analysis tool (or script) is commonly used in your research field, consulting with your colleagues might be just an efficient way to get a general idea about the resource requirement of the tool.
Monitor the resource consumption (with an interactive test job)
A good way of estimating the wall time and memory requirement is through monitoring the usage of them at run time. This approach is only feasible if you run the job interactively through a graphical interface. Nevertheless, it’s encouraged to test your data analysis computation interactively once before submitting it to the cluster with a large number of batch jobs. Through the interactive test, one could easily debug issues and measure the resource usage.
Upon the start of an interactive job, a resource consumption monitor is shown on the top-right corner of your VNC desktop. An example is shown in the following screenshot:
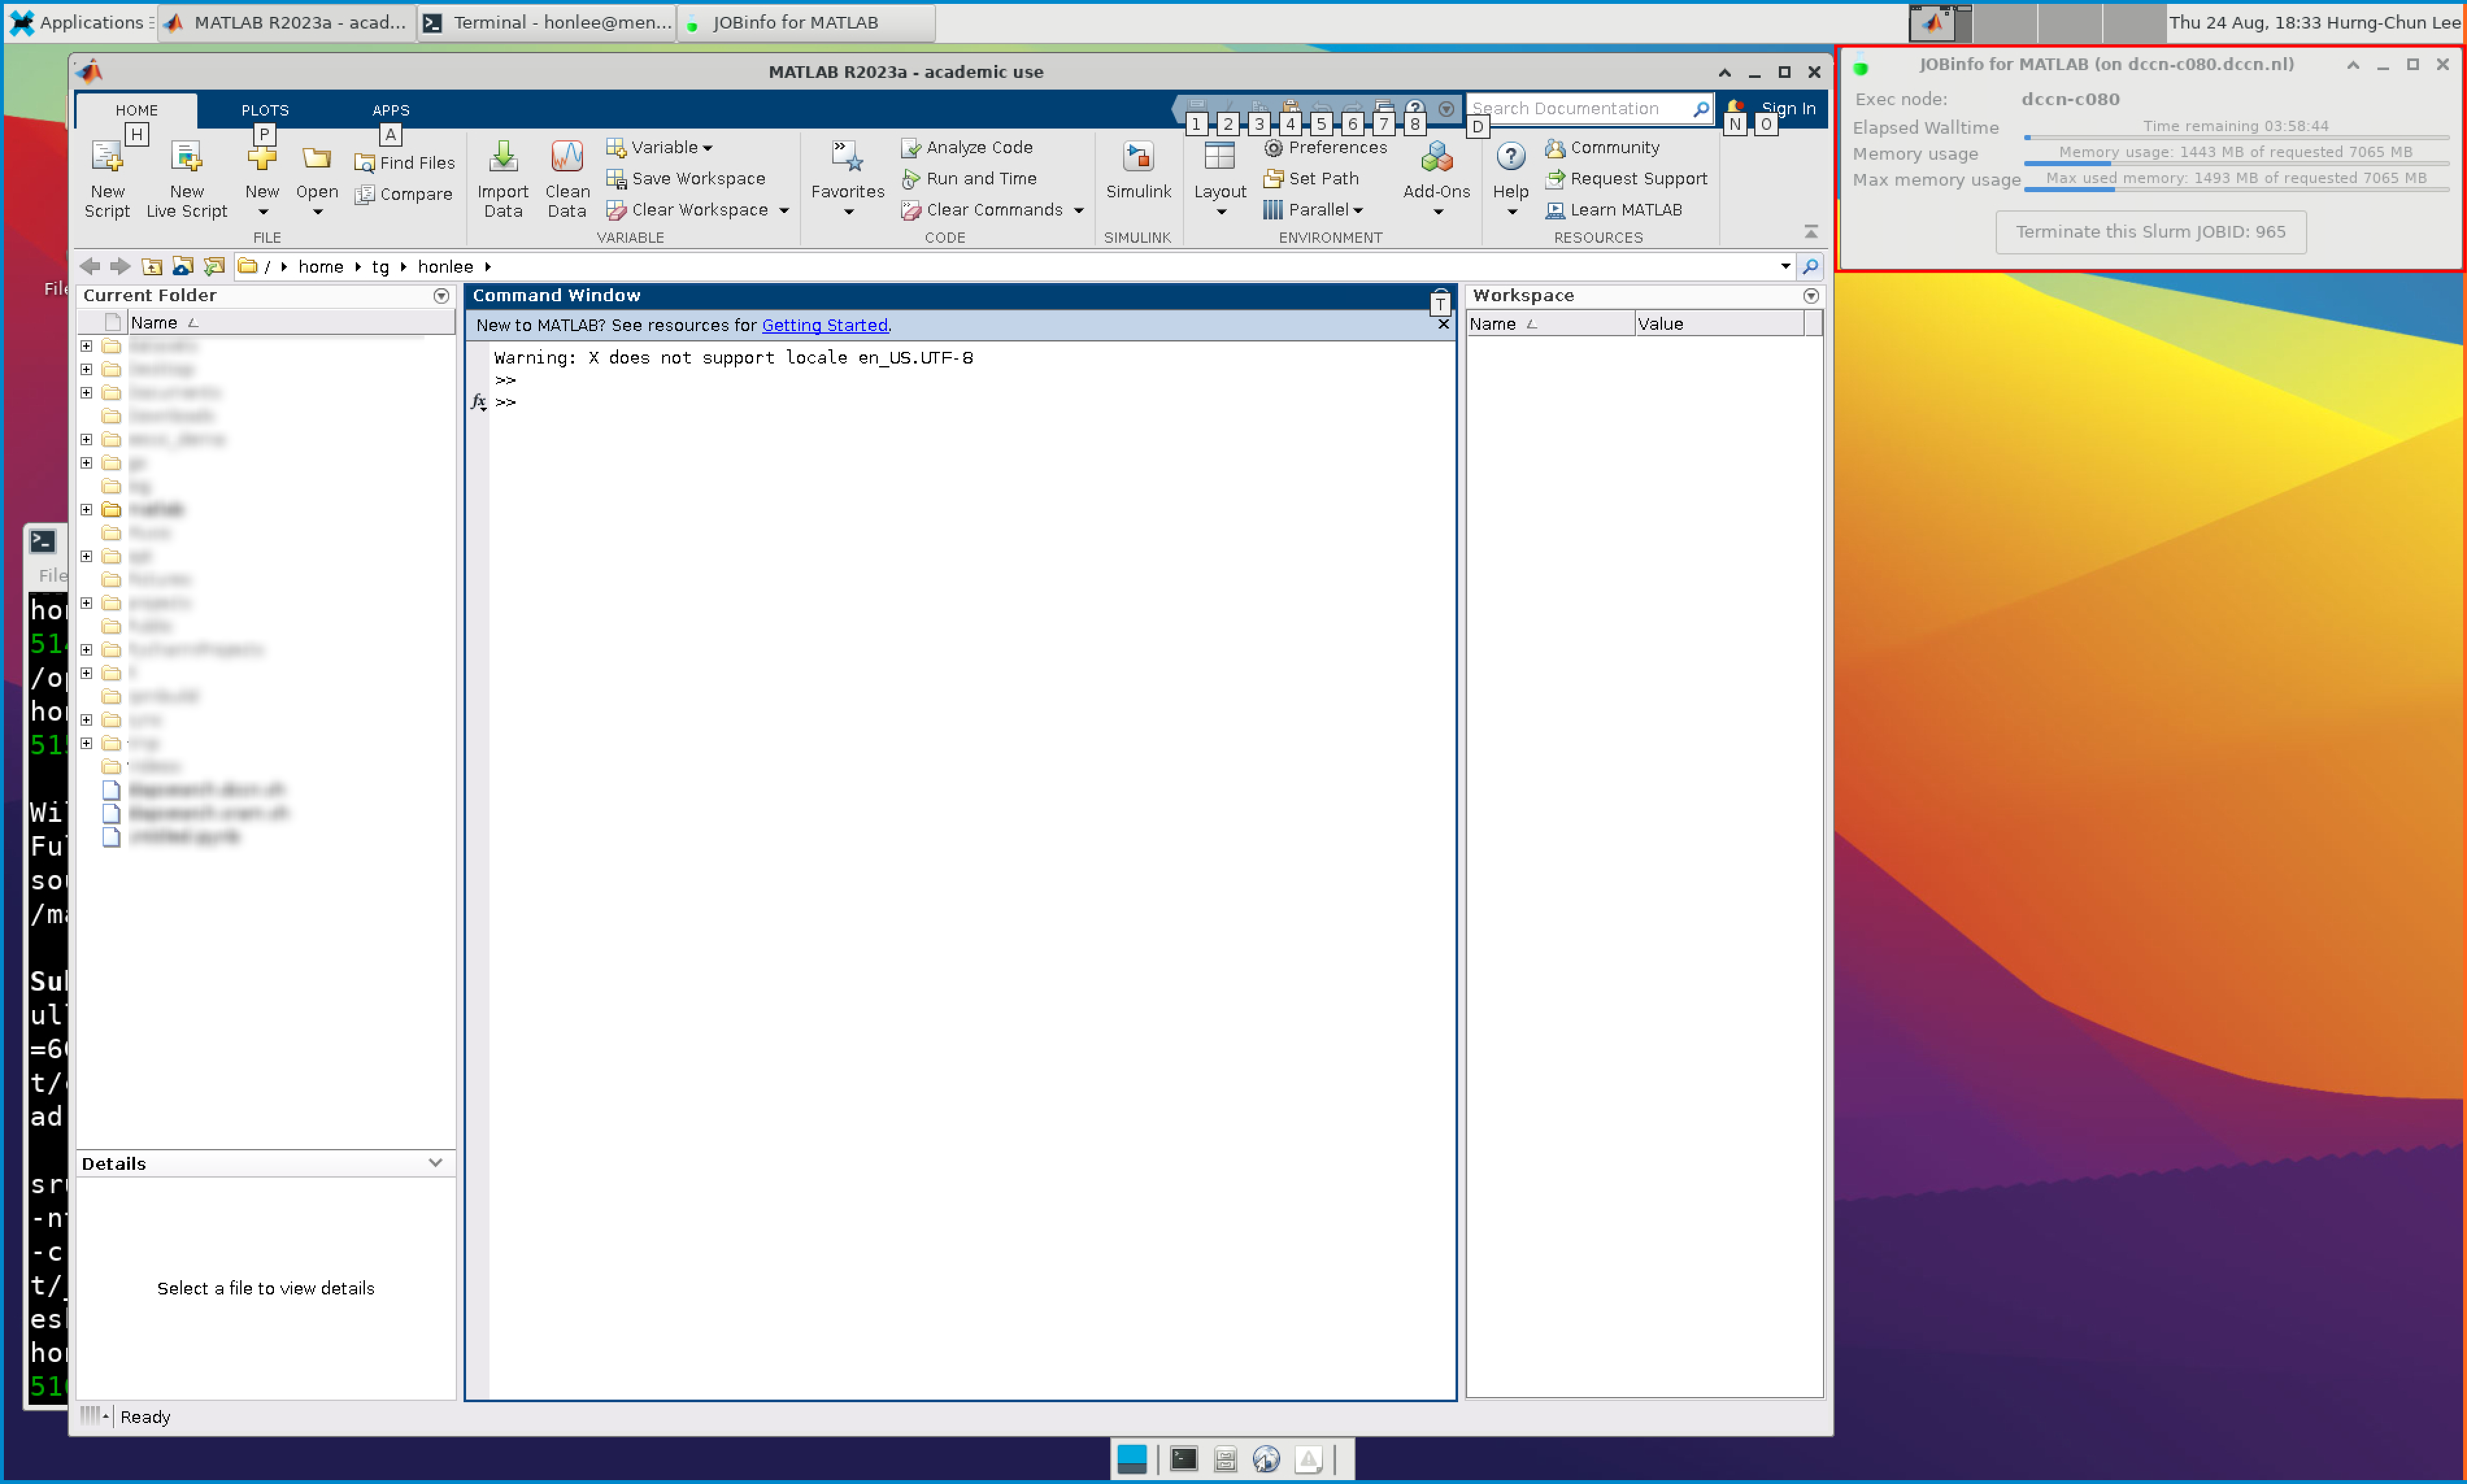
The resource monitor consists of three bars. From top to bottom, they are:
Elapsed walltime: the bar indicates the elapsed walltime consumed by the job. It also shows the remaining walltime. The walltime is adjusted accordingly to the CPU speed.
Memory usage: the bar indicates the current memory usage of the job.
Max memory usage: the bar indicates the peak memory usage of the job.
Check the epilogue information at the end of the job output stream
For batch jobs, the epilogue script also writes the accounting information to the job’s output stream. One could also take it as a reference to determine the amount of resources needed for the computation.